A protractor is a handy tool for measuring angles in a diagram. The diagram has to be accurately drawn and “to scale” for this to work – the size of angles on a quickly drawn diagram won’t be accurate. So you wouldn’t be able to measure angles from a diagram like this one:
Sponsored Links
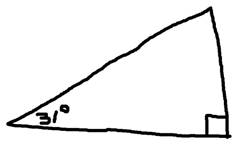
It’s pretty easy to tell that it’s hand drawn and that the angles in the corners are only roughly drawn. For instance, the right angle, which should be 90°, looks more like it’s 85°. There’s nothing wrong with a diagram like this, you just have to remember you won’t be able to use a protractor to measure angles on it.
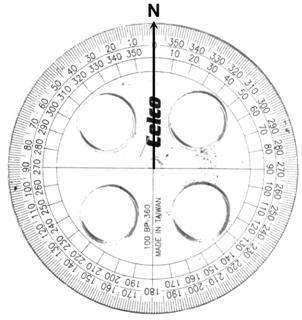
But if I do have an accurately drawn diagram, then I can use a protractor to measure the angle. Let’s use a bearings question as an example:
|
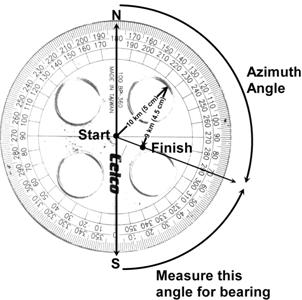
Bob is out bushwalking. He walks 10 km in a direction 45° east of north. He stops for a while, before he walks another 9 km in a direction 22° west of south. What is the bearing from where he started to where he finished? Express this bearing as an azimuth. How far is he from where he started? Solve the problem by drawing a scale diagram and using your protractor. |
|
Solution |
|
The key to most bearing problems is to have a good diagram. Since we’re going to use our protractor to measure some angles, the diagram has to be “to scale” and accurate, otherwise we won’t be able to measure any angles accurately. To start off drawing the diagram, we need to draw Bob’s starting location. We can just use a dot:
Now we need to draw in where he walks. The first part of his walk is 10 km long. Since we’re drawing the diagram “to scale”, we need to choose a scale which is appropriate for drawing a diagram on the page. How about for every km, we draw a line 0.5 cm long? This means that this 10 km part of his walk should be drawn as a line 5 cm long. What direction should it be drawn in? Well, the direction is said to be “45° east of north”. North is usually drawn as an arrow straight up the page. East is usually to the right of the page. So we need to start pointing north, rotate 45° to towards east, and then draw our line. We can use our protractor to help us do this. Start by drawing a dotted line indicating where north is:
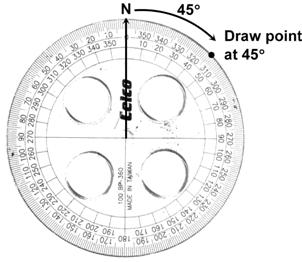
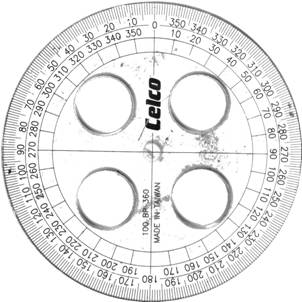
Now we need to measure 45° towards east from this north pointing line. There are two things you need to do with your protractor when measuring angles: Place the centre of the protractor over the point where you’re measuring the angle from. In this case, we’re measuring the angle from Bob’s starting position. Line up the ‘0’ angle on the outside of the protractor with the line from which you’re measuring the angle. In this case, we’re measuring from north towards east, so we line up our ‘0’ angle with the north line.
Now all we have to do is measure 45° from north towards east. See how there are two sets of numbers around the outside of the protractor? Each set is for measuring angles in a different direction. The outermost set is for measuring angles in an anti-clockwise direction. The innermost set is for measuring angles in a clockwise direction. On different protractors these two sets of angles might be swapped around. Measuring from north towards east is a clockwise direction, so we’ll use the inner set of angles. All we have to is count 45° and then put a little mark showing this angle:
Now we want to draw a 5 cm long line from Bob’s starting point, in the direction of this mark. This line represents the first part of Bob’s journey, when he walks 10 km in the direction 45° east of north:
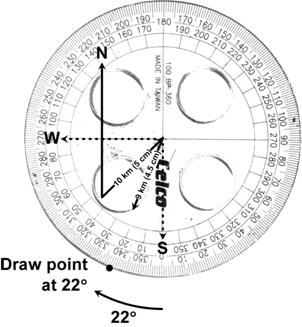
Notice how the line that you drew doesn’t go all the way to the dot you marked for 45°. Because of the size of the protractor, often the dots or marks you draw for an angle are a lot further from the centre point then you need. Not to worry though, this doesn’t matter. Just line up a ruler with the centre point and the mark, and draw the line as long as it needs to be. Part 2 of Bob’s journey is a 9 km walk 22° west of south. We need to move the protractor so its centre is over the last point in his journey, like in the following diagram. Also, we need to line up the ‘0’ angle on the protractor with the line we’re measuring the new angle from. Since we’re measuring 22° west of south, we are measuring the angle from the direction south, which is a line straight down the page.
We’re measuring the angle from south towards west, which means we’re measuring in a clockwise direction. This means we need to use the inner set of angles on the protractor. We need to count 22° clockwise from south, and mark that angle like it is in the diagram. Next, we have to decide how long the line we draw is going to be. Bob walks 9 km in this part of the hike, and we are using 0.5 cm to represent each km. This means that this section of the hike should be 9 lots of 0.5 cm long, or 4.5 cm in other words. We can draw in this line on our diagram:
Now we just have to work out what the bearing and the azimuth of Bob’s final position is. We can draw a line showing the direction from his starting position to his final position like this:
The bearing from his starting to finishing position is in the ‘bottom’ half of the circle of possible bearings. This means that we’ll need to describe the bearing relative to the direction south. Also, the bearing is in the right half, which means that we’ll also be using east to describe the direction. So our final bearing is going to sound something like, “? Degrees east of south.” So how can we work out this angle? Well, we need to measure how big the angle is, starting from south and rotating towards the east:
By my measurements, the angle is about 70°. So this means the overall bearing is: 70 degrees east of south Now, the question also asked for an azimuth. This is just the angle from north to the direction, measured in a clockwise direction. Now we could measure it using the protractor, or we could use the measurement we’ve already made. Between north and south there is 180°. We’ve already measured the angle between south and our direction as being about 70°. We can calculate what the angle between north and our direction is by: This means we’ve only got one more thing to work out – the distance between Bob’s starting and finishing positions. We can do this by measuring the distance using a ruler, and then converting the cm to km. All we need to remember is that in our scale diagrams, each km is represented by 0.5 cm.
By my measurements, the line from the start to the finish was about 1.96 cm long. To convert this into km, we just need to do this: The ‘cm’ term is the distance of the line in cm.
The So Bob ends up 3.92 km from where he started, in a direction 70 degrees east of south from where he started. The azimuth from where he started is 110º. |